
Overview
As part of our ongoing efforts to simplify workflows and improve efficiency, we are migrating from Jira Service Desk to Linear (Linear Asks in Slack) for ticket management.
Linear provides a more streamlined, integrated experience directly within Slack, allowing employees to create, track, and follow up on requests without switching platforms.
This transition will help us:
- Centralize communication and ticket tracking
- Improve visibility and accountability across teams
- Reduce response times
- Simplify the overall request submission process
This guide explains how to create tickets using Linear Asks, select the correct category, and monitor your requests through to resolution.
Installing Linear Asks in Slack
Before creating tickets, both new and existing employees must add the Linear Asks app to their personal Slack workspace.
This only needs to be done once and allows you to submit and track requests directly from Slack.
Step 1 — Open the Apps Section in Slack
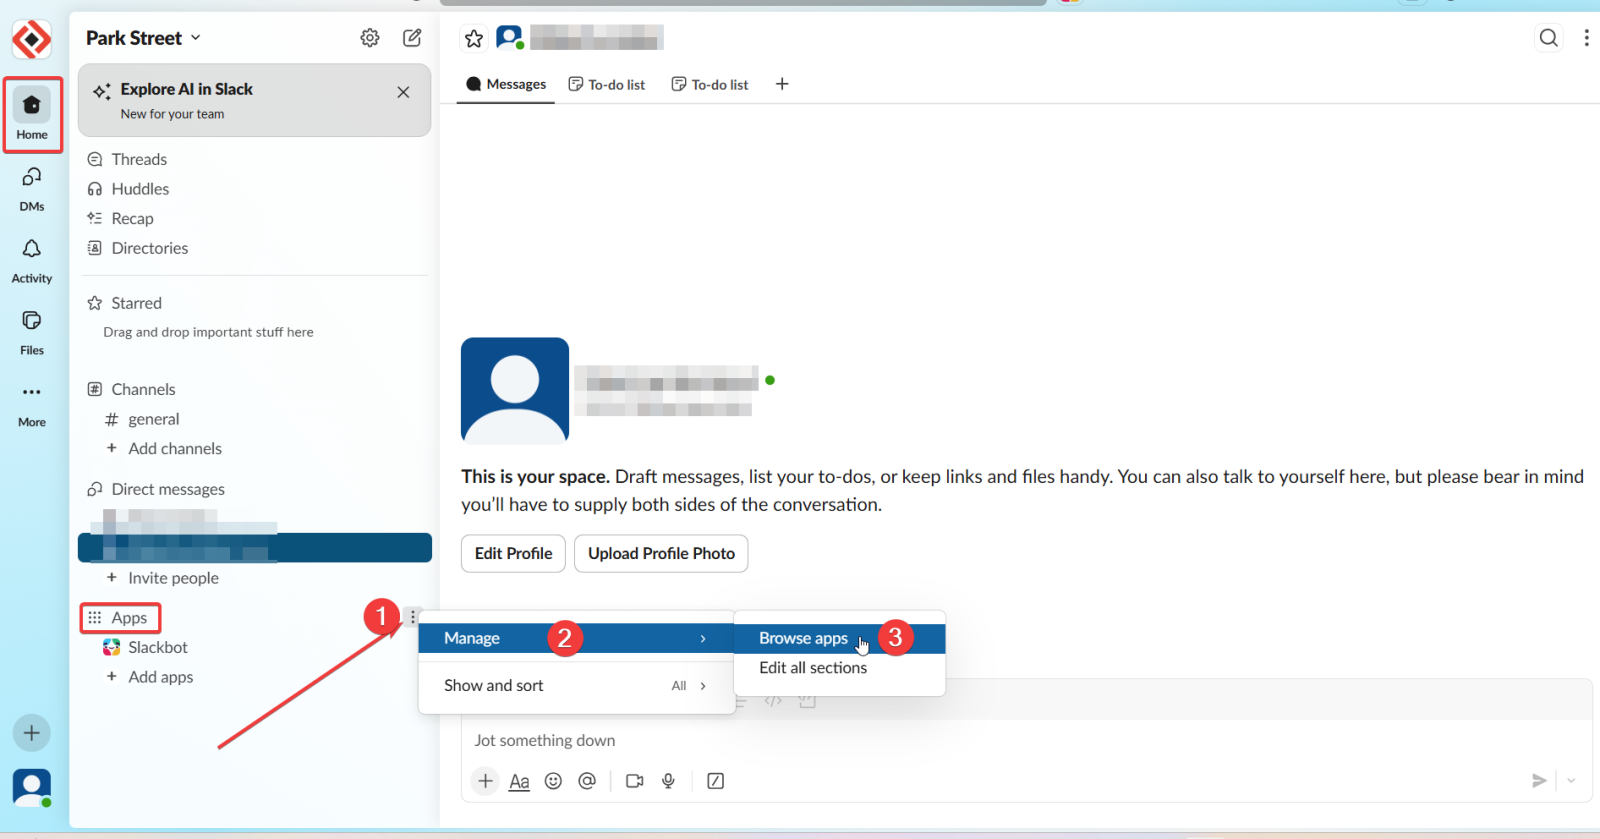
In Slack, scroll down the left sidebar until you reach the Apps section.
Click on the three dots (⋯) next to Apps.
From the menu, select:
Manage → Browse Apps
This will open the Slack App directory.
Step 2 — Find for Linear Asks
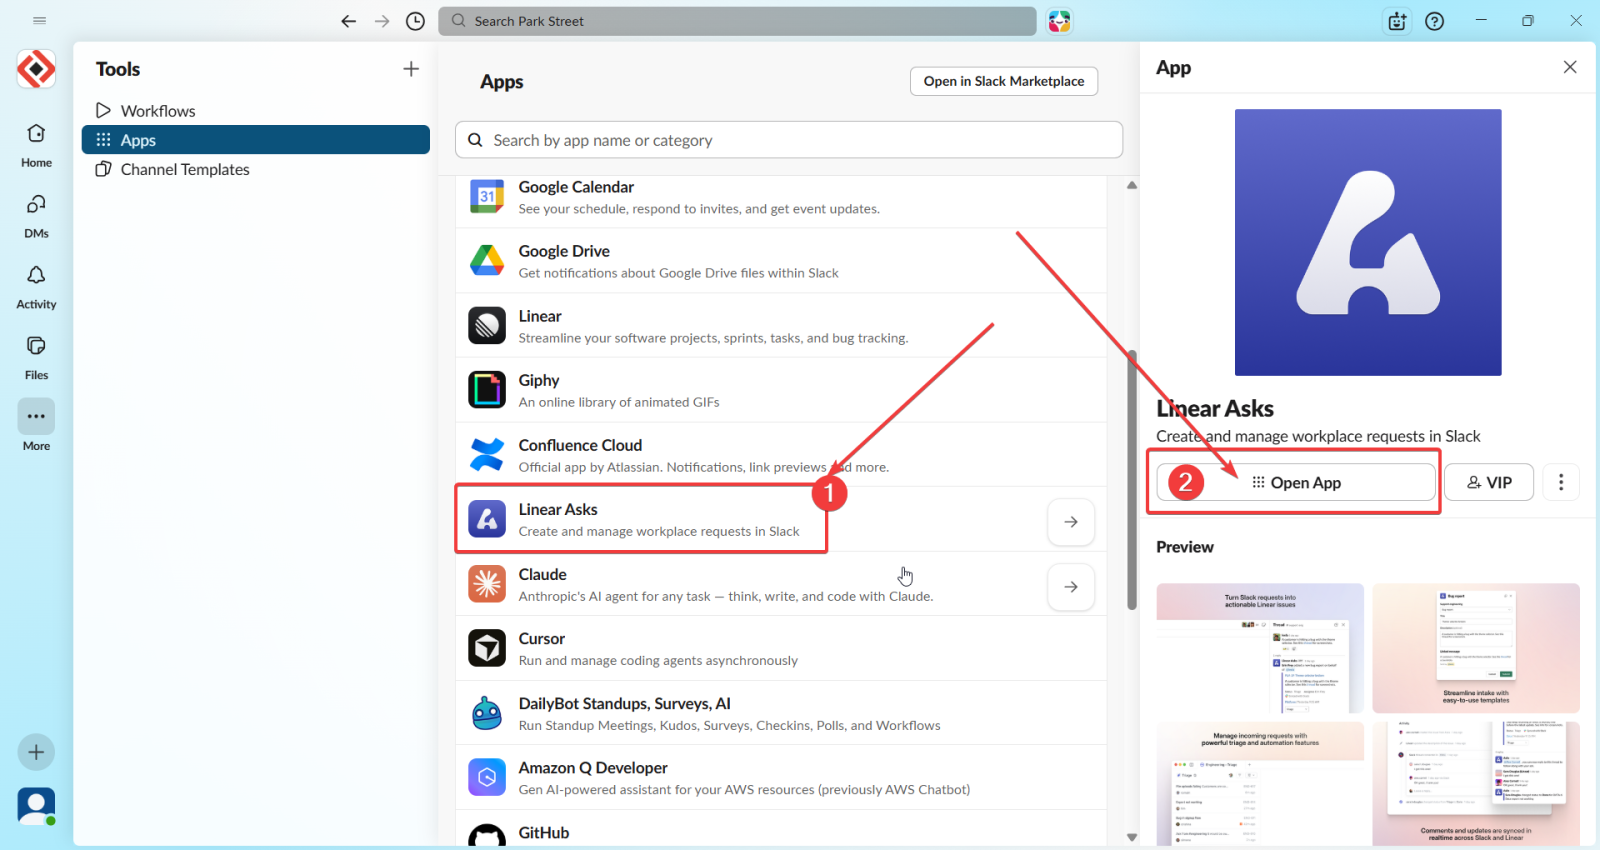
Scroll down o search to find Linear Asks:
Select Linear Asks from the results and click Open App
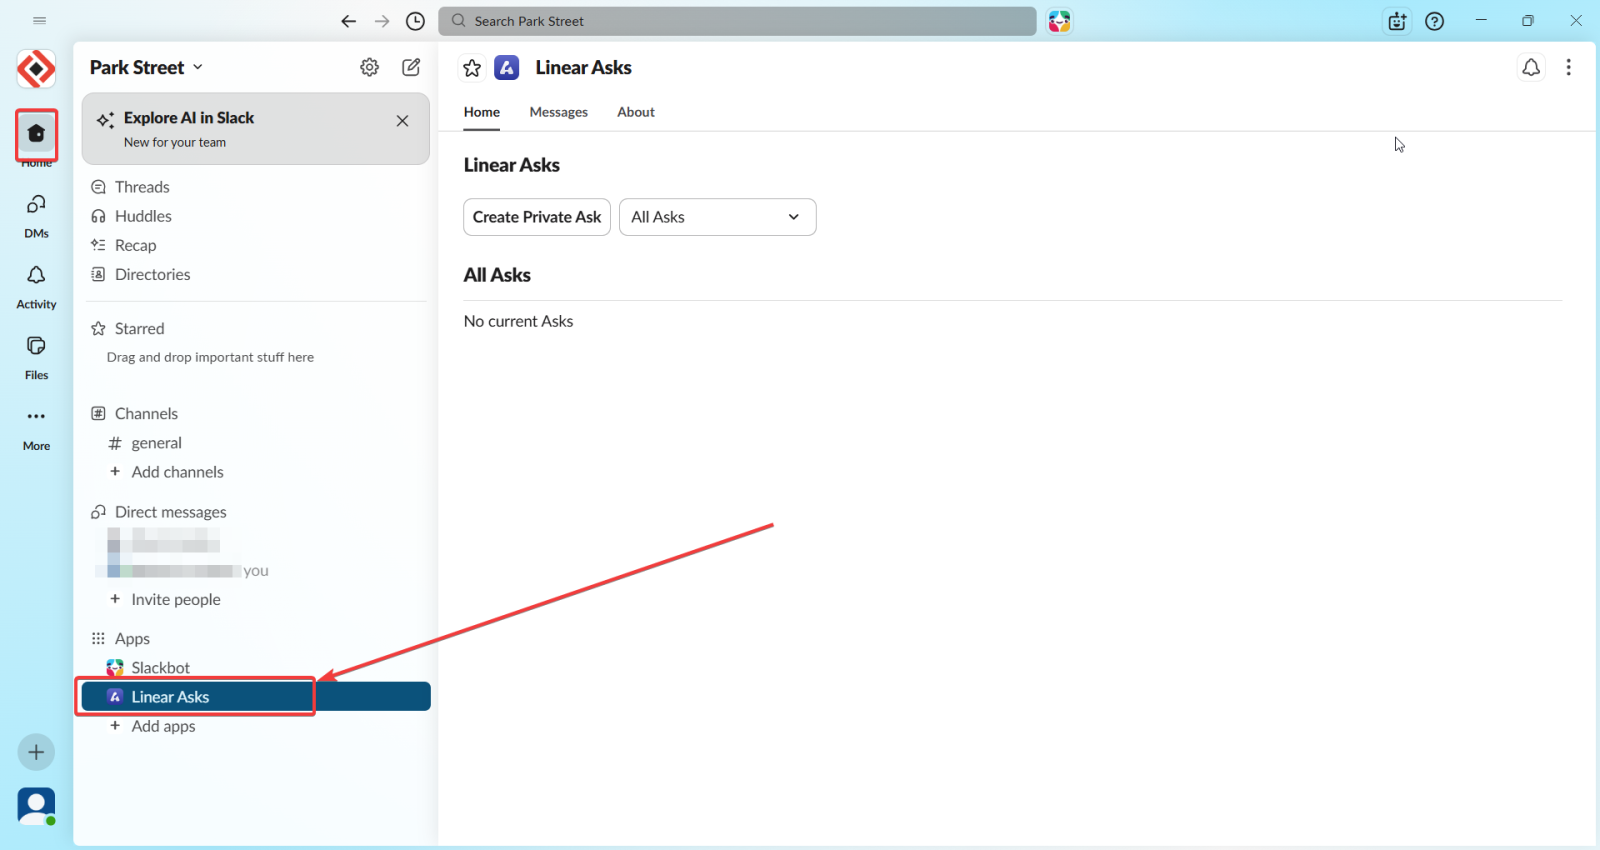
Once opened, Linear Asks will automatically be added to your Slack Apps list.
You should now see Linear Asks under the Apps section in your Slack sidebar.
This means you are ready to start creating and tracking tickets.
Creating a Ticket in Slack (Linear Asks)
There are two ways to create a ticket using Linear Asks.
Option 1: Create a Ticket from the Linear Asks App (Recommended)
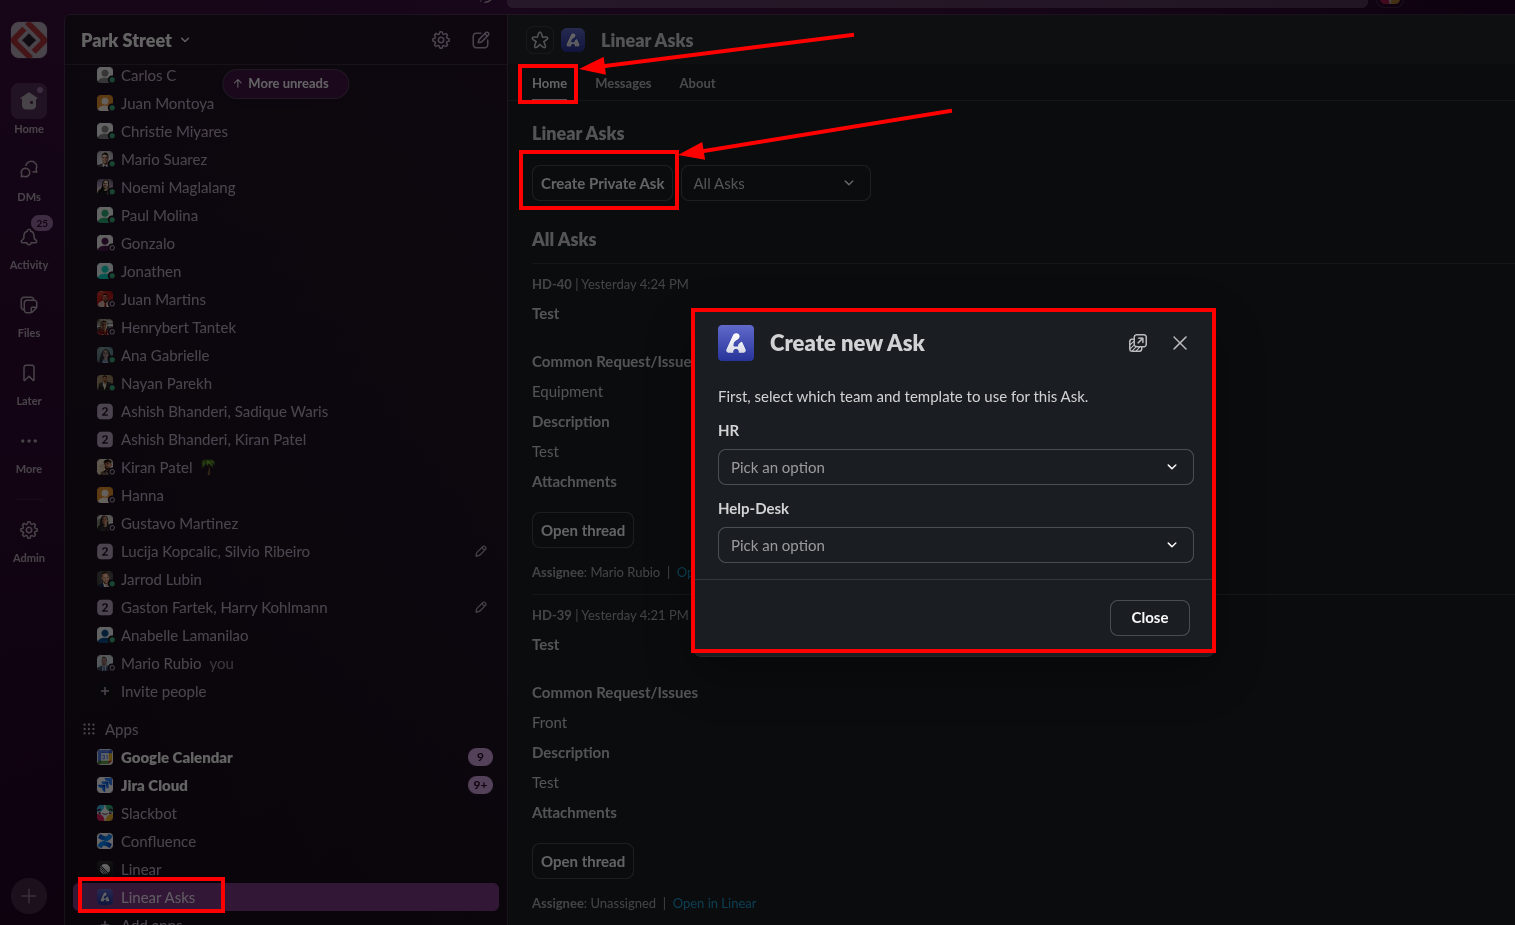
Step 1: Open Linear Asks
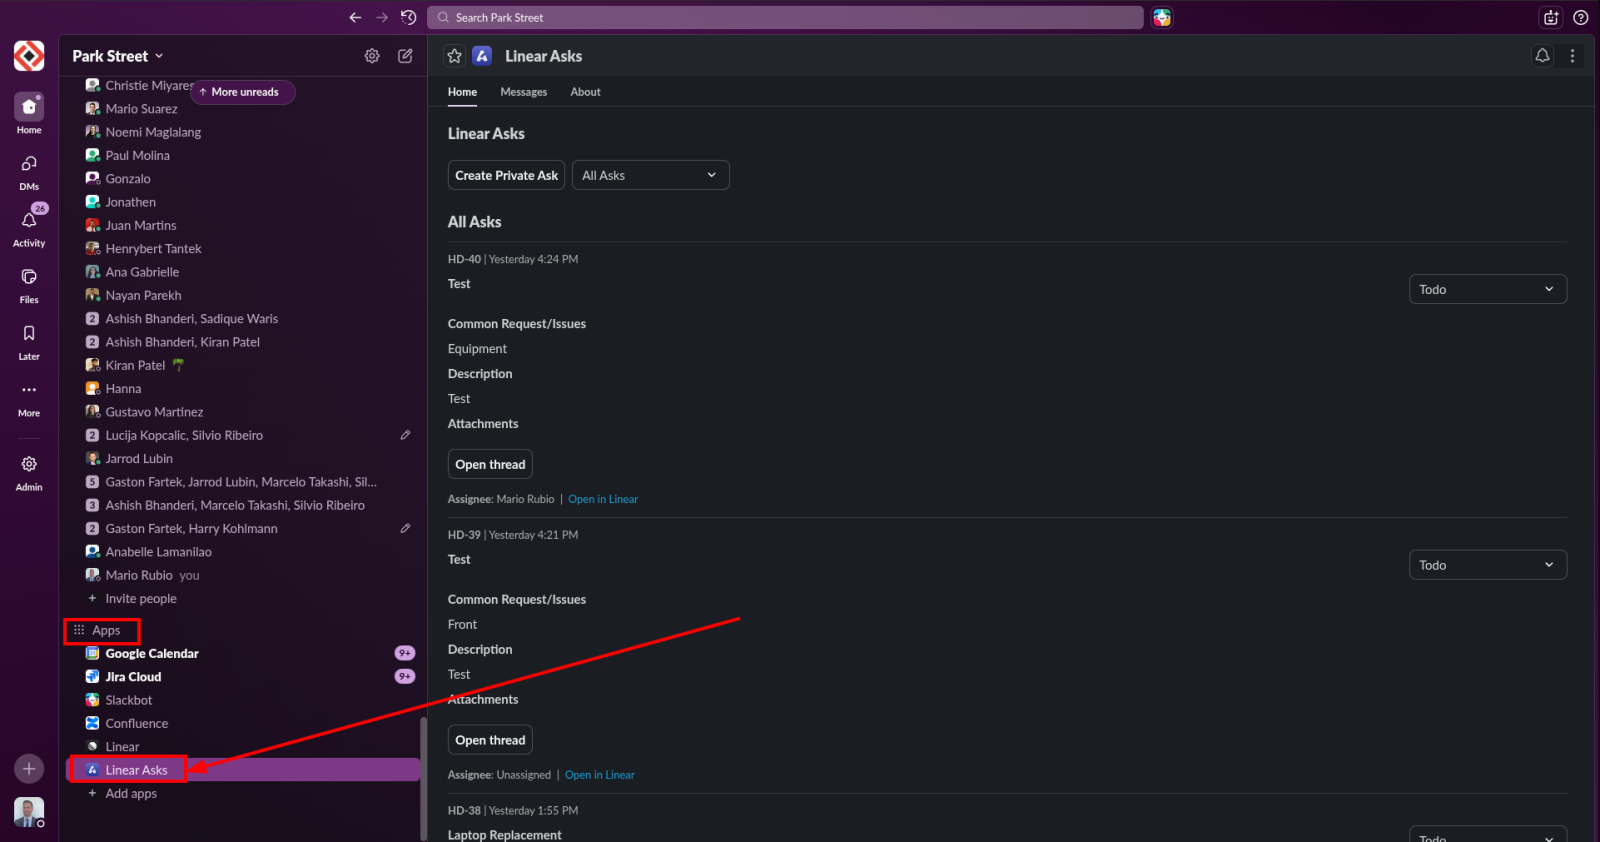
At the bottom of Slack, open the Linear Asks app.
Step 2: Go to the Home Tab
Inside Linear Asks, navigate to the Home tab.
Click on “Create Private Ask.”
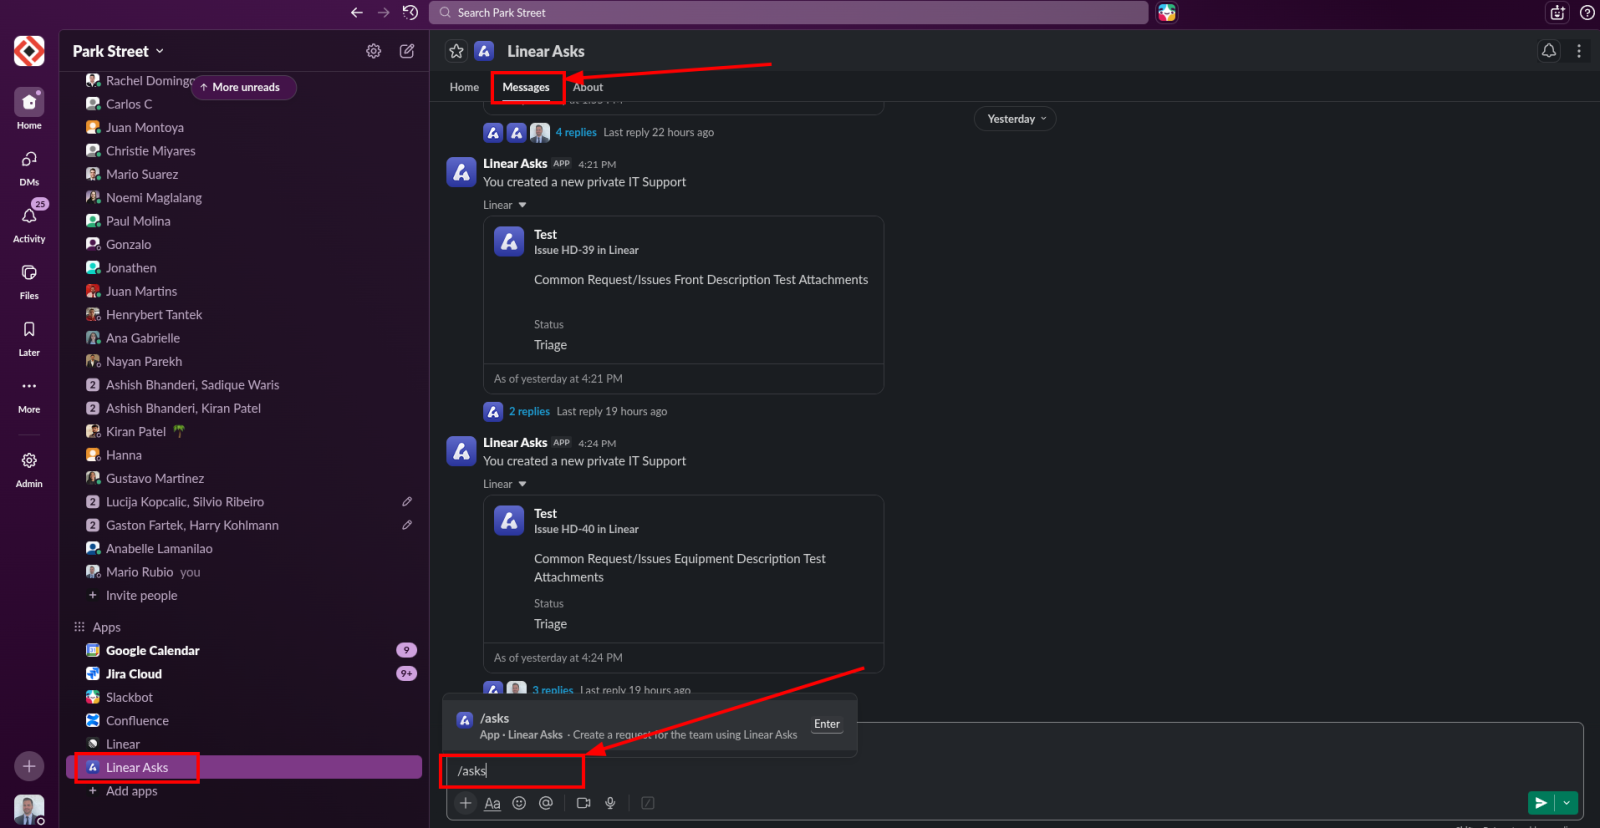
Option 2: Create a Ticket Using the /ask Command
- Go to the Messages tab in Slack.
- Type
/askand press Enter. - The same ticket creation prompt will appear.
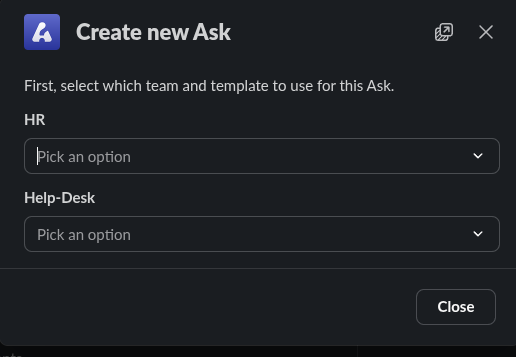
Selecting the Correct Category
When the ticket prompt opens, select the appropriate category.
Choosing the correct category ensures your request is routed to the right team
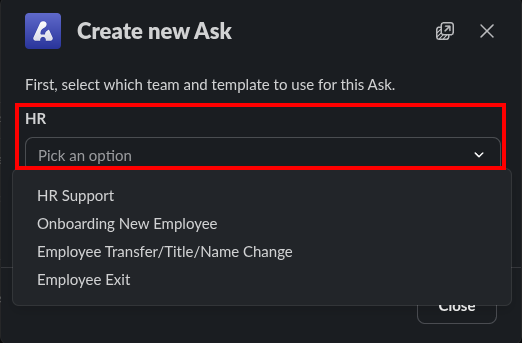
HR
Select HR for requests related to:
- Onboarding
- Exit processes
- Transfers
- Any other Human Resources inquiries
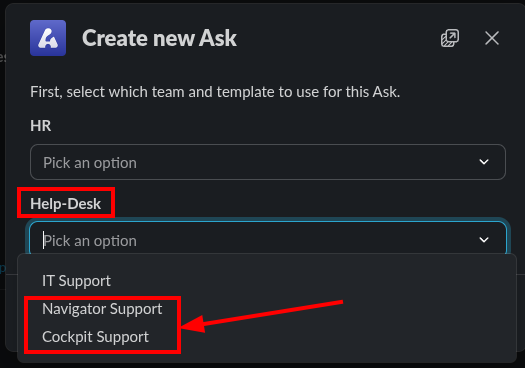
Help-Desk
Select Help-Desk for operational or technical requests.
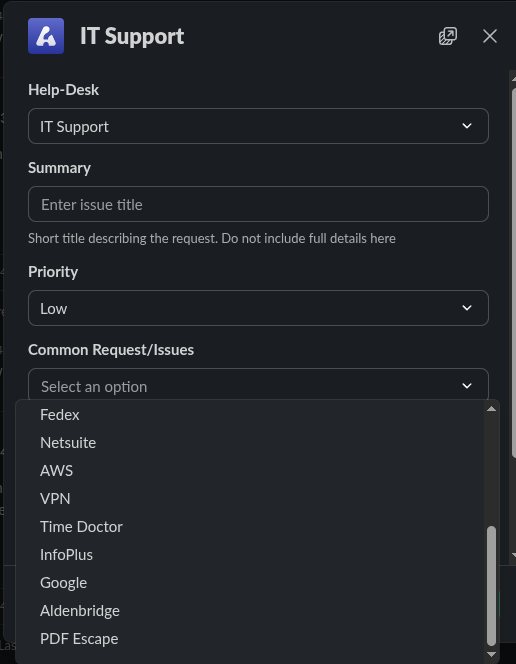
Within Help-Desk, you will see:
1- IT Support
Use this option for:
- Access requests (new access, access changes, permission updates, account lockouts)
- Workstation equipment issues
- Software or application issues
- Cloud platforms and infrastructure
- Business applications and internal tools
In general, if your request involves a system, platform, software tool, account access, device, or infrastructure, it should be submitted under IT Support.
Help-Desk
Under Help-Desk, you will see the following product support options:
2. Navigator Support
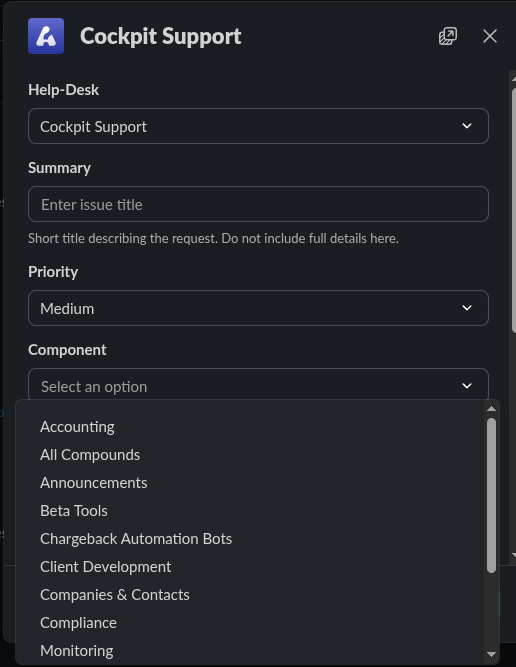
3. Cockpit Support
Select one of these options for product-related requests specific to each platform.
Use this category for issues or questions related to platform functionality, workflows, or internal product tools.
This includes, but is not limited to:
- Accounting
- Operational workflows
- Compliance
- Beta tools
- Chargebacks
- Product behavior or system logic
- Data discrepancies within the platform
- Platform-specific errors
If your request is related to how the product works, behaves, or processes data inside Navigator or Cockpit, it should be submitted under the appropriate product support option.
Providing a Clear Description
When submitting your request, include:
- Summary
- Priority
- Full Description.
- Who is impacted
- Steps to reproduce (if applicable)
- Any relevant screenshots. video or logs
The more detailed your description, the faster the issue can be resolved.
How to Follow Up on Your Ticket
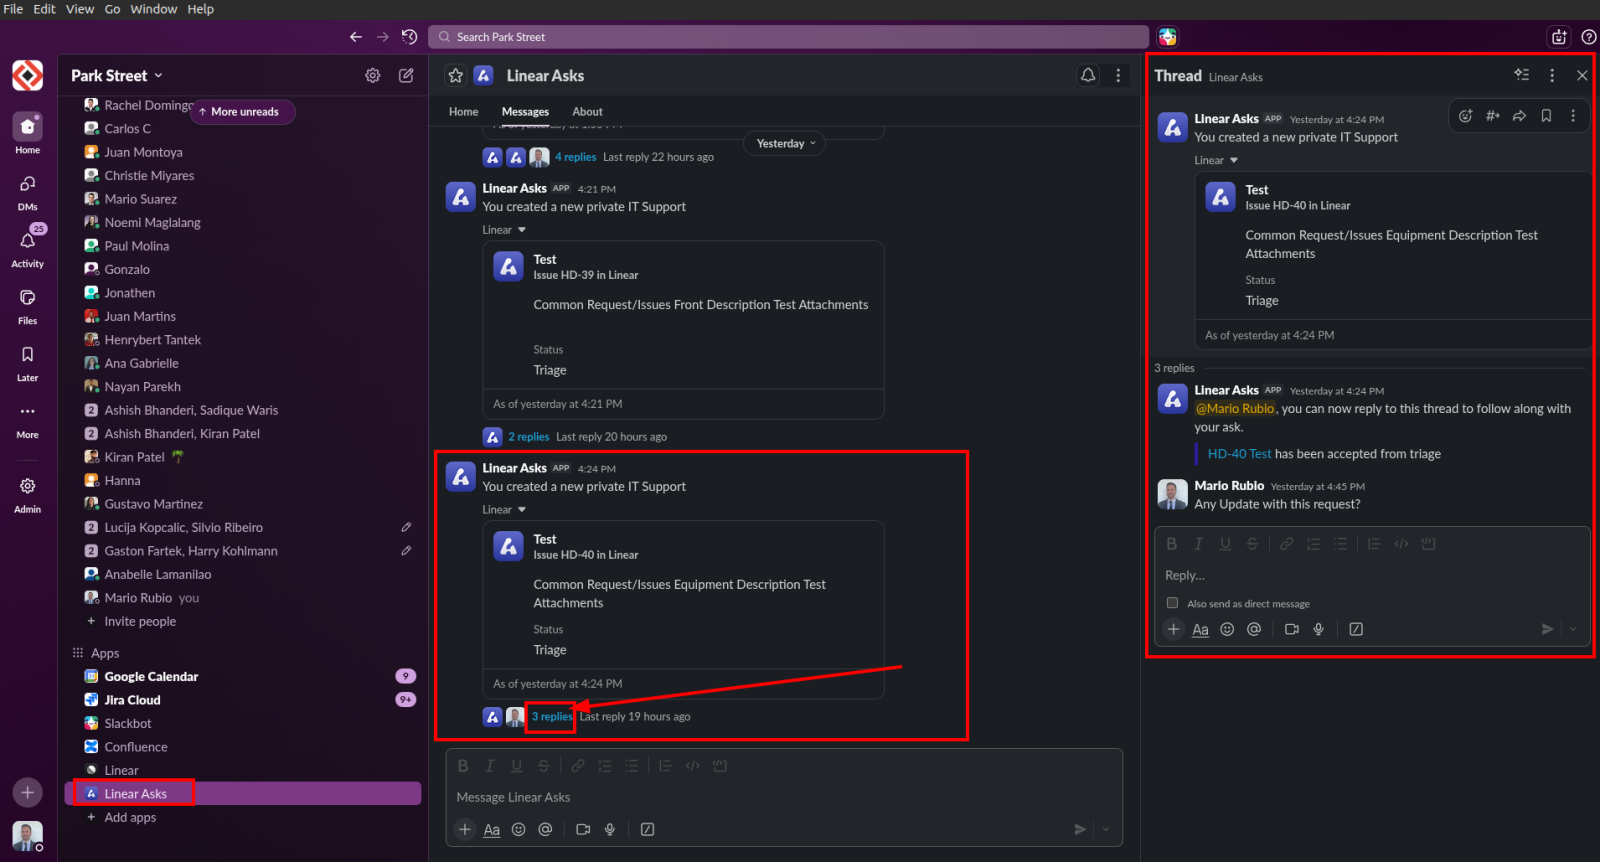
You can easily monitor progress and communicate updates within Linear Asks.
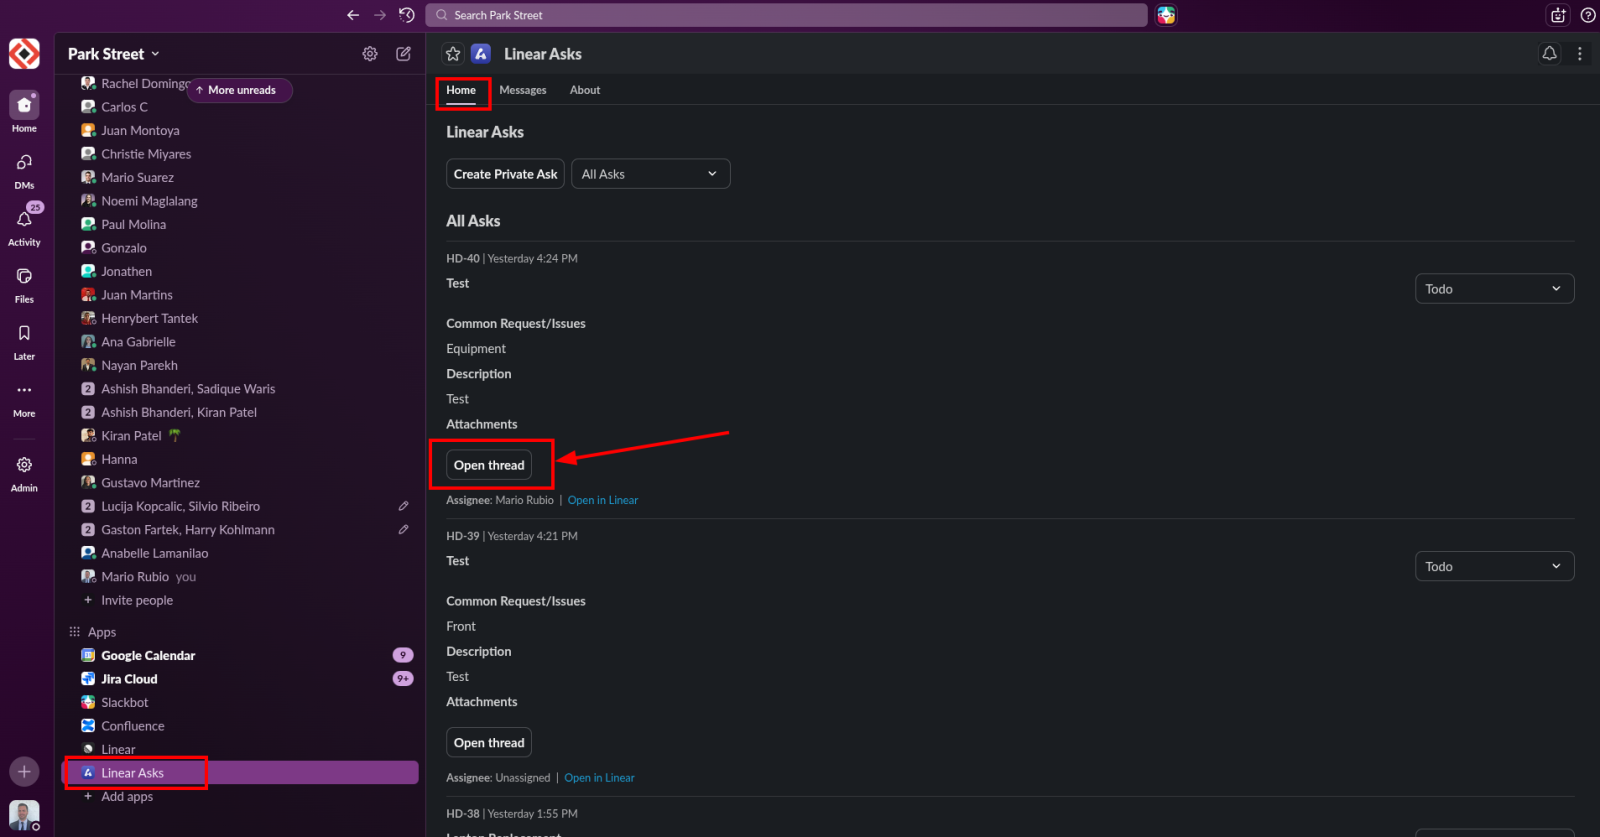
Step 1: Open the Asks Section
1- Go to the Linear Asks app and navigate to Asks.
2- Find your ticket in the list.
3- Click on the Ticket Thread.
This will route you to the dedicated thread where you can:
- Request updates
- Review progress
- Communicate with the assigned team
Viewing Ticket Details
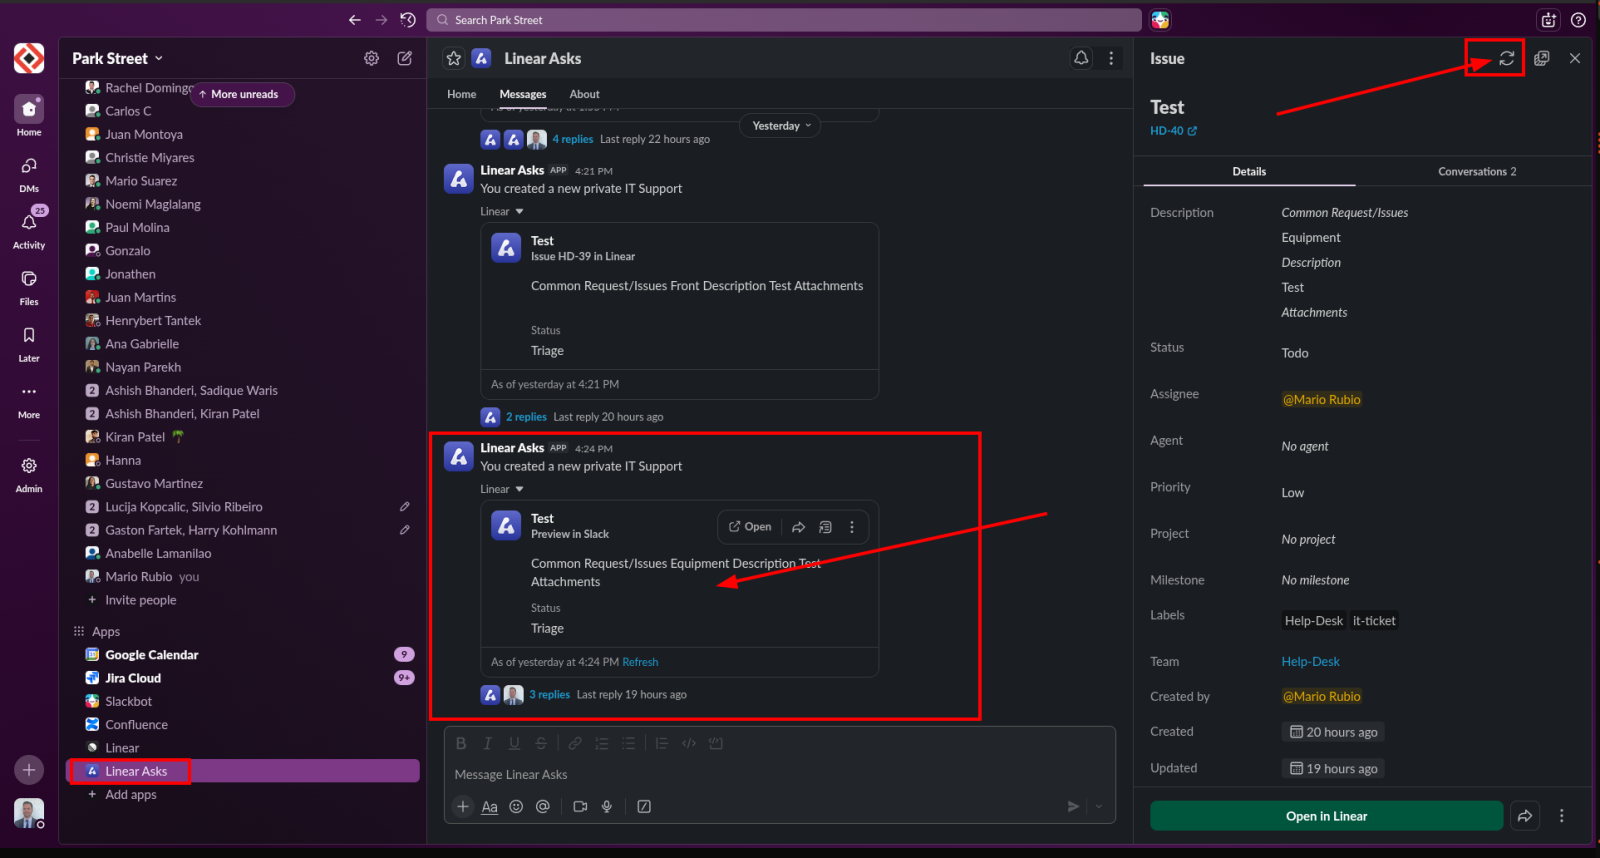
If you click directly on the Ticket, you can see:
- Assignee
- Priority
- Status
- Additional ticket information
In the top-right corner, you can refresh the ticket to see the most recent updates.
This ensures you are always viewing the latest status and activity.
Best Practices
- Always create a ticket instead of managing requests only through Slack messages.
- Choose the correct category (HR vs Help-Desk).
- Provide clear, actionable descriptions.
- Include screenshots or logs when applicable.
- Follow up directly in the ticket thread to maintain visibility.
Ticket Priority Guidelines
To ensure proper routing and response times, all tickets must be assigned the appropriate priority level.
Priority determines how quickly an issue is addressed and where it is positioned in the resolution queue or backlog.
⚠️ Important: Managers may adjust priority based on business impact, client risk, or operational urgency.
Ticket Priority Guidelines
| Priority | Use When | Business Impact | Examples |
|---|---|---|---|
| 🔴 Urgent | System or critical feature is completely down | Severe business impact | System-wide outage Security issue Core workflow unavailable for all users Manager escalation due to client risk |
| 🟠 High | Major issue affecting multiple users or clients | Significant productivity impact | Key feature malfunction Performance degradation Issue impacting multiple users Manager escalation |
| 🟡 Medium | Limited impact, workaround available | Moderate or localized impact | Affects a few users Partial feature issue Report inconsistency Cosmetic issue with impact |
| 🟢 Low | Minimal impact or informational | Low or no productivity impact | Minor UI issue Documentation clarification Non-urgent request General inquiry |